-
Canelés de Bordeaux
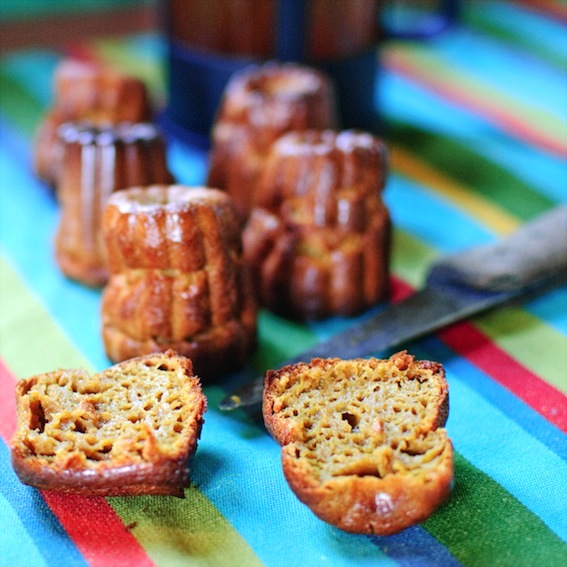
There is an exquisite patisserie called Pariès in Bayonne, which is the capital of the Basque country in south-western France. They recently produced a book of their recipes, which Idrooled overdiscovered the other day. Bayonne is famous for its chocolate, amongst other things, and was one of the first places in Europe to produce chocolate in the early 17th century. There is always a deliciously rich, chocolate-laden aroma in the streets of the city centre. It’s sometimes worth just strolling around there to get a fix!
I will be sharing some of the chocolate recipes from this absolute gem of a book, but today I made another regional speciality: canelé [kan-ul-ay]. A canelé (or cannelé) is a small French pastry with a moist custard-like centre and a dark, thick caramelized crust. It is the shape of a striated cylinder approximately 5 cms in height and is a specialty of Bordeaux.
These contain too much sugar for me to claim that they’re positively good for you. Having said that, I made them with cane sugar and spelt flour (of course!) and as they contain rich, ‘real’ ingredients they are most definitely a healthier choice as a treat than anything in packaging! I had to make a second batch to photograph because the first batch disappeared far too quickly; They’re that moreish!
Ingredients (makes about 12)
You will need a special canelé mould to make these. The best are made from copper, although I used silicon.
400ml milk
20g salted butter
2 egg yolks
1 egg
140g sugar (I used cane sugar)
120g flour (I used spelt flour)
1 vanilla pod
10cl rum
A little extra butter for greasing the moulds
Beat the egg yolks, egg and sugar in a mixing bowl. Add the flour and vanilla and continue to mix gently. Bring the milk to the boil in a saucepan, remove from the heat and immediately add the butter. When the milk has cooled to lukewarm, add to the other ingredients in the mixing bowl. Mix well. Leave the mixture to rest in the fridge for at least 24 hours, 48 hours if possible. This is important as the mixture must be as ‘airless’ as possible or it will rise during cooking. Also for this reason, it must always be mixed gently, taking care not to add too much air.
To cook the canelés, preheat the oven to 220°C. Remove the mixture from the fridge and very gently stir the (what will now be separated) batter until homogenous. Add the rum at this stage too. Fill the buttered moulds about 7/8 full. Cook for 10 minutes at 220°C and then turn the oven down to 190°C. Cook for a further 40 minutes. Leave to cool before eating. -
Spelt flour crêpes and the chaos theory according to Hugo
by Hugo, Canine Correspondent

In the interests of transparency (have you noticed the trendy lingo I’m picking up?), I asked to write today’s blog because I don’t think that the Bossy One is always very honest with you.
The way she presents her recipes would have you believe that she’s a domestic goddess (I heard that on the television), when in fact, nothing could be further from the truth. The havoc she creates in the kitchen is quite something. Not that I’m not complaining because the more the food ends up on the floor, the happier I am. 🙂
Today’s recipe, for example, should really read something like this:
Sift the flour, salt and bicarbonate of soda into a mixing bowl, use a large shovel to scoop up the ingredients that somehow landed outside the bowl, whilst simultaneously trying to recover from violent coughing and sneezing fit caused by inhaled flour. Make a well in the centre and break the eggs into it, mutter obscenities and pick the broken bits of eggshell out with your fingernails. Whisk the eggs, little by little incorporating the surrounding flour. If you use an electric whisk, you can be sure that a substantial amount of mixture will end up on the surrounding walls, sometimes even the ceiling. Combine the almond milk and water and add little by little to the flour/egg mixture. Turn the whisk to SLOW before pouring in liquid, otherwise it will ricochet alarmingly which isn’t good because it causes more mad muttering (I can also do alliteration :-)). Once all the liquid has been added, continue to whisk until you obtain a smooth batter, the consistency of thin cream (yeah right; in her dreams!). Push back messy hair, smothering small amount of ‘smooth’ ( 😆 ) batter over face.
I won’t go on because she can be a bit sensitive when it comes to criticism, even if it is constructive, and I’d like to continue this writing lark. I will leave you with this thought though: this is a simple recipe – just imagine the scenario with a complicated one 😉

Thank you for your kind words Hugo, I think I’ll take over now. This is based on Delia Smith’s recipe for ‘basic pancakes’, which I have adapted to use with spelt flour and almond milk.
Ingredients (makes about 10 crêpes)
110g spelt flour
pinch of salt
pinch of bicarbonate of soda
2 large eggs
200ml almond milk
75ml water
butter or coconut oil for cooking
Sift the flour, salt and bicarbonate of soda into a mixing bowl, make a well in the centre and break the eggs into it. Whisk the eggs, little by little incorporating the surrounding flour. Combine the almond milk and water and add little by little to the flour/egg mixture. Once all the liquid has been added, continue to whisk until you obtain a smooth batter, the consistency of thin cream.
To cook the crêpes you will need a shallow frying, or preferably a crêpe pan. Melt the butter or coconut oil making sure that the base of the frying pan is coated. Pour a small amount of batter into hot fat in the pan, tipping from side to side to distribute evenly. Cook until golden brown on both sides.

-
Lemon and ginger mini cheesecake tarts (gluten free and low glycemic index)
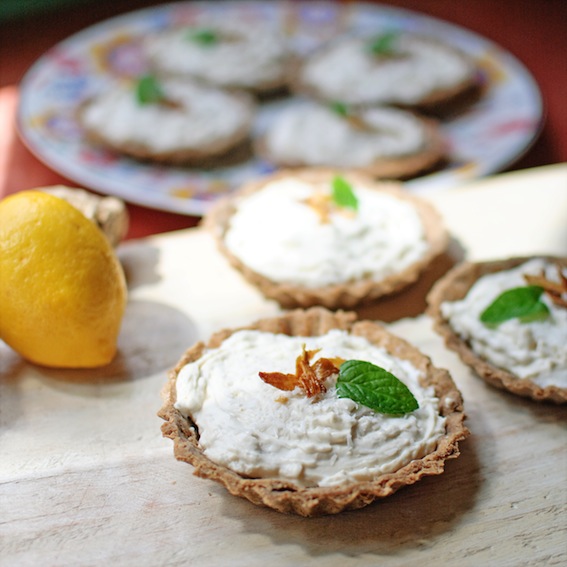
There are times when only cheesecake will do and yesterday was one of those times 🙂 As the only ingredients I had to hand were mascarpone, lemons and ginger (four hens and not an egg in sight, but don’t let’s go there), I created these tartlets. I have to say, they were divine and my cheesecake yearning was well and truly satisfied.
These tarts are gluten free and have a low glycemic index (neither buckwheat nor coconut flours contain gluten and they both have a low GI, as do all dairy products).
Ingredients for pastry (makes about six mini tarts)
75g buckwheat flour
35g coconut flour
30g butter
30g coconut oil
½ teaspoon powdered ginger
Pinch of sea salt
Roughly 6 tablespoons of cold water
Ingredients for cheesecake filling
250g mascarpone cheese
Juice of one lemon
1 tablespoon of freshly grated ginger
3 tablespoons chestnut purée
2 tablespoons desiccated coconut
Candied ginger and mint leaf to garnish
To make the pastry, begin by cutting the butter and coconut oil into small cubes. Add to the flours and a pinch of salt in a mixing bowl. Blend by hand until the mixture becomes crumbly. Add the cold water, mixing rapidly with a spoon. Remove the mixture from the bowl onto a lightly floured surface. Knead until you obtain a ball of pastry (if the mixture isn’t ‘sticky’ enough to form a ball, you may need a drop more water). Wrap in a clean cotton tea towel or some cling film and leave to ‘rest’ in the fridge for about two hours. This relaxes the dough and makes it easier to use.
Preheat the oven to 180°C. Roll out the pastry on a clean, lightly floured surface and fill the tart tins. Bear in mind that buckwheat and coconut flour pastry is extremely crumbly as it contains no gluten to ‘stick’ it together. You’ll probably need to patch and press the pastry into the tins as opposed to just cutting and placing it in as you would with normal pastry. Cook the pastry for 15 minutes.
Blend all of the ‘cheesecake’ ingredients together well, fill the precooked tart cases and garnish with candied ginger and mint. Chill for at least an hour before serving. -
Coconut chocolate mousse cake (gf)

Asparagus season is here again and with it, the Great Asparagus Stand-off; my husband likes them best lightly boiled, I am partial to roasted. Léo likes them not at all, so I’m doing a recipe for chocolate cake. 😆
This cake, adapted from the recent cookbook ‘Honestly Healthy‘, is positively ambrosial. I’m sure it would be delicious without my alterations, but I have an almost pathological need to customise recipes. This cake also freezes well; I always freeze cakes in ready-cut slices because they would disappear far too quickly otherwise. Even a card-carrying chocoholic like me refuses to stoop so low as to actually break her teeth on frozen food in order to get a ‘fix’.
Ingredients (serves 10)
100g coconut flour
50g organic cocoa powder, sifted
500ml almond milk
60g coconut oil (melted)
60g salted butter (melted)
130g agave syrup
2 tablespoons yacon syrup*
4 eggs, beaten
Preheat the oven to 150°C and lightly grease a cake tin (I used a 24cm diameter tin). Combine the coconut flour and cocoa in a bowl. In another bowl combine the ‘wet’ ingredients (milk, oil, syrups, butter and eggs) and then fold the two lots of ingredients together. Transfer the mixture to the cake tin and bake for about 40 minutes (or until a skewer inserted into the centre of the cake comes out clean). Leave the cake to cool before transferring to a plate and dust with cocoa powder before serving.
* Yacon syrup is extracted from the roots of the yacon plant, indigenous to the Andes mountains. It has low glycemic index (it’s suitable for diabetics) containing up to 50% FOS (fructooligosacharides). -
Custard tarts (gf) and potential lawsuits

The past two weeks have been taken up with various trips and visitors, namely a skiing trip to the Pyrenees, five turbulent ten-year-olds, a labrador puppy and a couple of adolescent hens. Our skiing trip was wonderful, if slightly hair-raising at times. Once on skis, Léo doesn’t believe in doing anything that might slow himself down. I imagine that it’s a bit like skiing with a talking torpedo. According to him, speed control is for sissies and mothers and, as such (I fall into both categories), I was on the receiving end of several barbed ‘what kept you?’ rebukes. Despite this, the snow was abundant, the sun shone everyday and, all things considered, we managed to escape remarkably unscathed. The group of people knocked flying by my human bobsleigh son fell like dominos but won’t be pressing charges as it is thought his actions were not premeditated :-?, so that’s a relief.
These tarts make excellent chairlift food: delectable, nourishing and not too fragile. They are also a good source of milk and eggs for growingtorpedoeschildren. Cooked milk is easier to digest than pasturised milk as the cooking process breaks down the complex proteins, making them more accessible.
Ingredients for pastry (makes about six mini tarts):
110g buckwheat flour
25g butter
25g virgin coconut oil
Roughly 6 tablespoons of cold water
Ingredients for custard:
250ml whole milk
250ml cream
4 tablespoons honey
3 egg yolks
1 teaspoon vanilla extract
To make the pastry, begin by cutting the butter and coconut oil into small cubes. Add to the flour in a mixing bowl and add a pinch of sea salt. Blend by hand until the mixture becomes crumbly. Add the cold water, mixing rapidly with a spoon. Remove the mixture from the bowl onto a lightly floured surface. Knead until you obtain a ball of pastry (if the mixture isn’t ‘sticky’ enough to form a ball, you may need a drop more water). Wrap in a clean cotton tea towel or some cling film and leave to ‘rest’ in the fridge for about two hours. This relaxes the dough and makes it easier to use.
Preheat the oven to 180°C. Roll out the pastry on a clean, lightly floured surface and fill the tart tins. Bear in mind that buckwheat pastry is extremely crumbly as it contains no gluten to ‘stick’ it together. You’ll probably need to patch and press the pastry into the tins as opposed to just cutting and placing it in as you would with normal pastry. Precook the pastry for 10 minutes.
Meanwhile, make the custard filling by cooking the milk and cream over a low heat. Beat the honey and egg yolks together and slowly add the heated milk and cream mixture, beating constantly. Add the vanilla, blending well and fill the pastry cases with the mixture. Bake at 180°C for about 20 minutes or until the surface begins to brown. Serve chilled. -
Guest post: Clementine and almond cake

Hi there, it’s Louisa here from Chez Foti and I’m guest blogging a recipe today for Fiona. We recently stumbled upon each other in the wonderful world of cyberspace and interestingly both happen to live down in deepest, darkest South West France. Well, Fiona lives in the bordering region of Aquitaine and I’m in Midi-Pyrenees, but that makes us practically neighbours in these distinctly rural and empty parts. And it’s not often you meet fellow English foodie bloggers down this way, so I’m delighted to meet her!
Over at Chez Foti I blog hearty, generally healthy, wholesome family friendly fodder that’s always seasonal and uses local as possible fresh ingredients. Since I have a two and a four year old to nourish most of my recipes are quick and simple to prepare and obviously very child-friendly. Though there’s the occasional dalliance into grown-ups-only fair and a little naughtiness here and there. Life really is too short to be good all the time!
My recipe for you, on our little cakey blog swop, is a fabulous (chocolateless!) Clementine & Almond Cake. A wheatless, dairy-free delight which, without deliberately intending to be, is actually pretty darned good for you and almost as good as cake can get. Though if you want to naughty things up a little it’s wonderful with a big dollop of crème fraiche or Mascarpone!
Ingredients:
375g of clementines, tangerines or satsumas (they all work!)
5 large free range eggs
175g of cane sugar
250g of ground almonds
a heaped teaspoon of baking powder, sieved
a tablespoon of Amaretto, optional
a little icing sugar for dusting
Special Equipment: a 21cm spring-sided baking tin lined with greaseproof paper
Place the clementines in a saucepan and cover the fruit with cold water. Bring to the boil, cover and leave to simmer away for 2 hours. Top up the water level as it drops. After 2 hours remove from the water and allow to cool for a few minutes before whizzing to a pulp in a processor (or with a stick blender).
Pre-heat your oven to 190ºC.
Now on with this cinch of a cake. Whisk up the eggs in a large bowl, using a balloon whisk. Then whisk in the sugar followed by the ground almonds and baking powder. Finally stir in the clementine pulp.
Pour the cake mixture into your lined cake tin and bake in the pre-heated oven for around 40 minutes. It should be golden on top, firm to touch and an inserted skewer will come out clean. Leave to cool in the tin on a cooling rack.
Once cool carefully remove from the tin and lightly dust with sieved icing sugar. Serve as is or with a naughty spoon of creme fraiche or mascarpone. And if you can possible wait, this cake is even better the next day…
Thank you Louisa for this recipe — I can vouch for it because I made it and it was pure ambrosia. Visit Louisa’s blog, Chez Foti, for other delicious recipes like this one and some excellent vegetable gardening advice. Fiona, The Healthy Epicurean 🙂 -
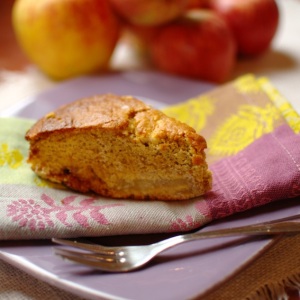
Spelt apple cake and discomfiting headwear
I had assumed that I’d become immune to embarrassment, thanks to a long haul desensitisation programme courtesy of my husband. It just wasn’t humanly possible to blush every single time someone fell victim to his uninhibited candour (‘if I had feet like yours, I wouldn’t wear open-toed shoes’ springs to mind).
But for some reason, in his Basque terrorist guise when we went out to lunch today, he inadvertently excelled himself. Obviously I have nothing against Basque terrorists per se. After all, nobody can wear a beret quite like a Basque. And their food is beyond divine. Of course, they hit a low point when they started blowing things up, but nobody’s perfect. But the beret, a promotional gift from our local DIY store with their logo written across the front in BRIGHT RED LETTERS, proved to be a cringe too far. I appear to have become, amongst other things, a beret snob 😳
This apple cake is as simple as it gets, but no less delicious for it and certainly nothing to be ashamed of; I’ve had enough shame for one week 😉
Ingredients
2 large apples, peeled and sliced
handful of raisins
1/2 teaspoon cinnamon
150g cane sugar
200g spelt flour
1 teaspoon baking powder
1 teaspoon bicarbonate of soda
2 eggs, beaten
1 pot of yoghurt (125g)
75ml melted virgin coconut oil
75ml melted butter
Preheat the oven to 180°C. Poach the apples and raisins in a small amount of water. Add the cinnamon. Once the apples are soft (about 15 minutes), drain the excess cooking juice and set aside. Combine the sugar, flour, baking powder and bicarbonate of soda, then add the yoghurt, eggs and melted coconut oil and butter. Mix well. Stir in the poached apples and cook in a medium-sized cake tin for 30 minutes. -
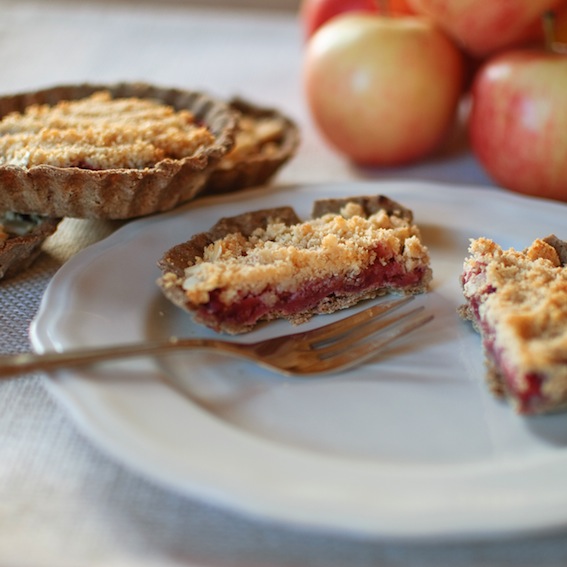
Raspberry and apple tart with almond topping and crabby electronics
I’ve had a very busy week accomplishing lots of useful things: I grilled two computers (one was struck by lightning, which wasn’t really my fault; the other was struck by impatience, which was.) My credit card was chewed up because I think I’m capable of talking and typing my PIN number simultaneously. A non-identified metal object fell off the bottom of the car and I burned out the motor of the Kitchenaid (which is quite a feat as they’re meant to be indestructible.) I am typing this very cautiously on my ipad, fully expecting it to spontaneously combust at any minute. If I don’t post for a while you’ll know why 😉
I did however manage to make these tarts without exploding the oven, so that was really quite encouraging. 🙂
Ingredients for pastry (serves 6-8):
150g buckwheat flour
70g spelt flour
50g butter
50g virgin coconut oil
Roughly 6 tablespoons of cold water
Ingredients for filling:
2 apples, peeled and sliced
60g raspberries
1 teaspoon cinnamon
Ingredients for topping:
60g powdered almonds
30g virgin coconut oil
15g cane sugar
10g almond flakes
To make the pastry, begin by cutting the butter and coconut oil into small cubes. Add to the flour in a mixing bowl and add a pinch of sea salt. Blend by hand until the mixture becomes crumbly. Add the cold water, mixing rapidly with a spoon. Remove the mixture from the bowl onto a lightly floured surface. Knead until you obtain a ball of pastry (if the mixture isn’t ‘sticky’ enough to form a ball, you may need a drop more water). Wrap in a clean cotton tea towel and leave to ‘rest’ in the fridge for about two hours. This relaxes the dough and makes it easier to use.
Preheat the oven to 180°C. Roll out the pastry on a clean, lightly floured surface and fill the tart tins. Precook the pastry for 12 minutes.
Poach the apples and raspberries in a little water, adding the cinnamon to the fruit. Prepare the topping by rubbing the coconut oil into the powdered almonds, before adding the sugar. Assemble the tarts once the pastry is pre-cooked by filling each pastry case with the poached fruit and then covering with crumble topping and almond flakes. Put back in the oven for 15-20 minutes, or until the topping is beginning to brown. -
White watermelon jam and tacky kitchen floors
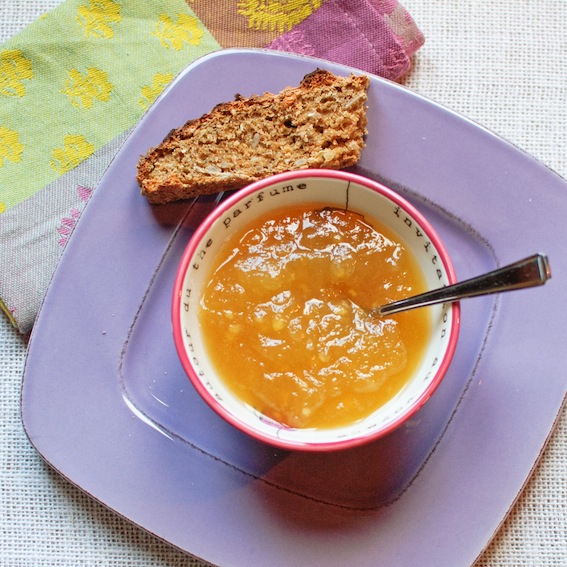
My poor kitchen has undergone another hostile takeover; my husband is in the midst of his biannual jamathon. I lose the use of my kitchen in September to fig jam and in January to white watermelon jam. God forbid we should grow any other jam-suitable fruit – I don’t think my nerves are sufficiently robust. I just don’t have the patience to make it myself – all that peeling and de-pipping would have me gnawing my limbs off. The truth is, once Luc, my husband, enters the kitchen he becomes a bit of a prima donna, and asOCDtidy as he usually is, the kitchen is left in a very sorry state. The floor tiles become hazardous and moving around becomes fraught with danger and an immense effort. You either have to unstick your foot vigourously after each step, or take long circuitous routes around puddles of sugary water. I’m wrung out just thinking about it. Of course, it goes without saying that the final result is beyond divine and after all, I was born to mop kitchen floors 😉
Ingredients (makes four or five jars)
1 white watermelon
250g cane sugar
1/2 lemon, grated and juiced
20g fresh ginger, grated
1 tsp cinnamon
Cut the watermelon into quarters, then peel and remove the seeds. Cut the flesh into cubes and put into a large pan. Add the sugar, ginger, lemon and cinnamon and gently heat to draw the moisture from the fruit. Simmer for between an hour and a half and two hours, or until desired consistency is obtained. This jam is fairly runny due to the relatively low sugar-content. Transfer into sterilised jam jars while still hot.
Watermelons are rich in many essential nutrients such as vitamins A, B1, B6 & C, pantothenic acid, biotin, potassium, and magnesium. They also fight cancer, relieve kidney disorders, reduce high blood pressure and the risk of heart problems, boost the immune system and help keep the eyes healthy. Get chopping ! -
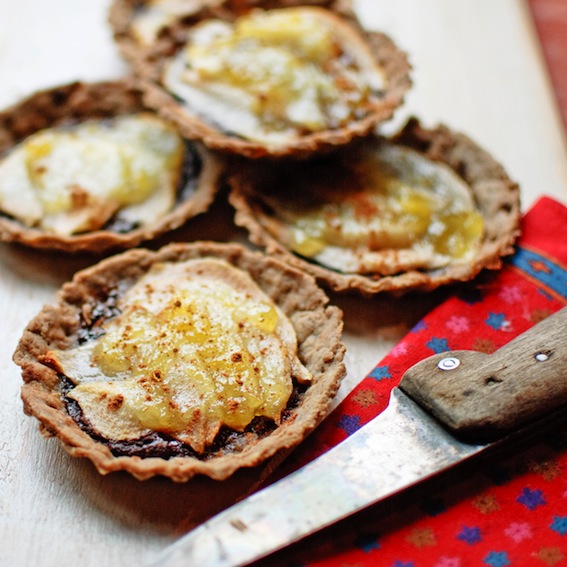
Chocolate and pear tarts, compulsive behaviour and chainsaws
This will be the last pear/chocolate recipe for a while, I promise. I appear (!) to have become slightly obsessed with this heavenly combination, but that’s still no excuse for being a bore. Talking of bores, I’ve been having wild cow-related issues this week. We’ve had a lot of very strong gales which, if you live here, translates into the need to travel everywhere with a chainsaw (pine trees are quite vulnerable and fall easily in high winds). Personally, I never go anywhere without mine – you just never know when it’s going to come in handy. Which brings me back to wild cows; I have spotted several within uncomfortably close range recently. When I reported my ‘sightings’ to the local Mairie, the information was met with a definite ‘course you did, dearie’ sort of look, which I thought was a bit audacious, especially in view of the contents of my car boot 😉
The pastry for this tart is wheat-free, but not entirely gluten-free, spelt containing a small amount.
Ingredients for pastry (serves 6-8):
150g buckwheat flour
70g spelt flour
50g butter
50g virgin coconut oil
Roughly 6 tablespoons of cold water
Ingredients for filling:
40g dark chocolate (min. 70% cocoa)
1 tablespoon rum
15ml cream
1 large pear
3 tablespoons watermelon, pear, apple or ginger jam
To make the pastry, begin by cutting the butter and coconut oil into small cubes. Add to the flour in a mixing bowl and add a pinch of sea salt. Blend by hand until the mixture becomes crumbly. Add the cold water, mixing rapidly with a spoon. Remove the mixture from the bowl onto a lightly floured surface. Knead until you obtain a ball of pastry (if the mixture isn’t ‘sticky’ enough to form a ball, you may need a drop more water). Wrap in a clean cotton tea towel and leave to ‘rest’ in the fridge for about two hours. This relaxes the dough and makes it easier to use.
Preheat the oven to 180°C. Roll out the pastry on a clean, lightly floured surface and fill the tart tins. Precook the pastry for 12 minutes.
Melt the chocolate with the rum. Once melted, add the cream and mix to form a smooth sauce. Line the base of each tart with the chocolate. Peel the pear and cut into thin slices. Cover the chocolate base with the pears, overlapping them to cover well. Cover the top with a thin layer of jam and then cook for about 15 minutes. Delicious hot or cold.


